FreeGuestPost

So you’re interested in guest posting – but how do you start? That’s where we come in. We are ateam of experts here to teach you the ins-and-outs of guest posting, and give you all the tools you need to get started.

Our blog will focus on a range of subjects from how to create titles, what apps will help build your blog, marketing and branding, and everything you need to get going with guest posting – whether you are a publisher or a writer.

We are also open to hearing and posting information you’re willing to share about guest posting, so feel free to contact us if you’d like to appear on our blog!

How to Optimize Your FGP Profile

At Free Guest Post, the relationship between writers and publishers needs to be built on trust. With Google becoming stricter with their guest posting rules, publishers need to be able to trust that the guest post article they are posting to their own blog will not be penalized by Google. Although Free Guest Post eliminates most of the worries a publisher might have, there is still some inherent risk in any guest posting situation.

The best way to earn that trust is to build up your reputation as a writer. Start on Free Guest Post by completing and optimizing your profile. Here are a few tips on how to create a trustworthy profile.

The Profile Picture

The biggest turnoff from any online profile is not having a picture of a real person. Think about online dating – would you even bother with a person who doesn’t have a picture? Free Guest Post is the same way. Your profile picture should be a clear, professional looking headshot. Don’t use pictures of pets, children, or anything else that isn’t your entire face. Keep it somewhat professional: you don’t have to wear a suit and tie, but you shouldn’t be doing anything inappropriate in the picture either. Remember that this picture will be published along with any articles you write on a publisher’s website.

Social Media

It is not necessary to include social media profiles, but it is recommended to share at least one. Doing so will allow publishers to do some more research on you. They may need to determine whether or not you are an expert with a certain topic.

Here at Free Guest Post, we understand that many Internet users value their online privacy. However, we also highly recommend setting up a Google+ account and sharing it on your profile. Google+ isn’t as popular as Facebook or Twitter, but it has the added option of setting up a Google Authorship account and AuthorRank. Claiming Google Authorship gives your posts more visibility. AuthorRank connects all of the articles you’ve ever written, giving them more opportunities for traffic as well. And, above all, Authorship and AuthorRank gives you more credence to Google, improving the SEO of your articles and any website that they are published on.

Writing About Yourself

The “About Me” section shows up on your profile. The “Author Bio” section will be automatically published with any article that is posted by a publisher. Feel free to use the “About Me” space to talk about yourself in a broad, casual sense. No pressure.

The “Author Bio” section should be professional and succinct. Try to make it no longer than 3-4 sentences. You’ll want to include a very brief description of your qualifications (such as “animal enthusiast” or “graduate of blank college with blank major”). Most people use this space to incorporate one of their backlinks.

Both sections are how a publisher gets to know you. Don’t be afraid to brag about your accomplishments, but also introduce some of your unique personality.

“Writes About”

This section is really just a simple list, but don’t neglect it! It’s really all about self-confidence – what do you think you’re qualified to write about? A publisher wants a writer who believes that they can do a topic justice. So if you don’t include the topic in your “writes about” list, why will they want to post an article by you on that topic?

… The End?

If you’re a blogger, you already know that the “About Me” section of your blog is vital. Think of your writer’s profile on Free Guest Post the exact same way: it introduces you to publishers and readers, giving them a taste of the exciting things you have to offer in your article. Good luck!

OCT FGP Tutorial: Fulfilling a Publisher Request

Hey everyone! We know that submitting articles to Free Guest Post as a writer for the first time can be kind of confusing, so we’re here to help you out!

There are three ways to submit a blog post. The first way is to fulfill a request by a publisher. You’ll find these requests under “Articles Requested by Publisher.”


Requested


Hover over the spot where it says “hover here” to read more information about what the publisher wants in the article he or she is requesting. Some might request a word count or specific angle. Be careful of publishers that don’t have any specifications at all. For example, in the video below, it shows that many of the requests do not have any details of what they would like in the requested post.

Websites that don’t offer clear direction are often link farms, a “black hat” SEO method that will get the culprit website(s) on Google’s bad side. However, some publishers are very clear about what they want in the article title or their website. The publisher requesting an article entitled “Online Casinos” has a website dedicated to casinos. Even though he or she does not offer detailed instructions for the post, you can see that his or her site does have direction.

Before fulfilling a request, you are encouraged to do some research on the publisher. Visit his or her website. If the website seems spammy, avoid it. Google will penalize your backlink if it is published on a website that it already views negatively.

Once you decide to fulfill a request, click “Fulfill Request.” This will take you to a page that looks like this:


2013-10-09_1134


Although there is space for you to write your post, we recommend first creating your article on a word processor, then copying and pasting it into the above text box. There is space for you to change the format of the post, add in hyperlinks, and insert pictures directly from Flickr.

When Writing a Post

  • Even if the publisher hasn’t specified a word count, you should write at least 300 words. 500 words would be even better.
  • Write unique, quality content.
  • If you are including a few keywords, do not saturate your article. Only use your keywords twice in the content, once in the title if the title hasn’t been provided already by the publisher.
  • If you are including hyperlinks, use those sparingly as well. The best place to include a backlink is in your bio. 2-3 hyperlinks are appropriate in the bulk of your post.
  • The title of the post can be tweaked, but please only alter it if the publisher hasn’t provided a proper one. For instance “Online Casinos” can be tweaked, but “The Benefits of Ionized Alkaline Water” is fine the way it is.
  • You can add tags to your post, but please don’t delete the ones that the publisher already added. Posts should have at least 2-3 tags, so feel free to add your own.
  • Always include your bio!

After Submitting Your Post

Once you’ve fulfilled the request, press the “Submit” button at the bottom of the page. The publisher will be notified, and will have five days to read over your article and publish it. This is what the publisher sees in his or her WordPress account:


wordpress


If the publisher declines to publish your article for whatever reason, it will go into the public pool of articles where any publisher can read it and request it.

Questions? Comments? Suggestions?

Free Guest Post is still in Beta mode, so we’re still working out a few kinks. If you’re having any technical issues or would like to send us a comment, please check out the “Feedback” section in the top right hand corner of your webpage.

If you have any questions specifically about this blog post, go head and ask in the comments below!

FGP Tutorial: Submitting An Article Without a Publisher Request

Hey everyone! So a couple weeks ago we created a tutorial helping you through the process offulfilling a publisher request. This time, we’re going to talk about how a writer can submit an article to FreeGuestPost.com without fulfilling a request.

We recommend that you first write your article in a word processor, then copy and paste it.

Now that it’s written, log in to your account on Free Guest Post. You should be directed to your dashboard, which will look like this:

FreeGuestPost.com


Click on “New Article.” It will take you here:

FreeGuestPost.com


Copy and paste your text into the box marked “Article Content.”

You can add images from Flickr using this button: FreeGuestPost.com

Add backlinks using this button: FreeGuestPost.com

And add pictures using a URL or uploaded from your computer with this button: FreeGuestPost.com

Make sure to fill out the “Article Tags” section and select a “General Topic Category.” This will make it much easier for publishers to find your article.

The bottom of your current webpage looks like this:

FreeGuestPost.com


Be sure to include a biography with your article. We recommend placing your backlink within your bio.

Underneath the “Biography” is a section called “Approval Required.” This allows you to be choosey about which publisher will use your article. If you select “no,” this means any publisher can grab your article and publish it to their website without first contacting you. Your published article will show up under “Articles” à “My Published Articles.” If you select “yes,” a publisher will have to request your permission to post your article.

We recommend that you do require your approval before a publisher can post your work. Under Google’s current algorithm, if your article is published on a website that Google penalizes, anything you write will have less merit to Google. That means that all of your articles will go down in SEO value.

Instead, do some research on any publisher that requests your articles. Make sure that their general site content is relevant to what you have written. Sites that look like link farms should be avoided.

If you have any questions about this process, feel free to ask in the comments below. Feedback is also appreciated, and can be given by pressing the “Feedback” button at the top of Free Guest Post’s website.

How to Guest Post Without Pissing Off Google

SEO, Link Trading, and Guest Blogging

We all know that SEO affects pagerank, and the purpose of having a high pagerank is to get more visitors to your website, which then results in more money – but what exactly does it mean to have a high pagerank? The real underlying message behind being at the top of a search query is that your website is an authority on a certain subject. What you are conveying to Google is that you are an expert on your keywords, and that the information contained on your website is valuable to readers. Because ultimately, Google doesn’t create SEO algorithms to help businesses or blogs earn more money. Nope – it’s all about the individual user for them, and how they can enhance the searching experience.

This is where linking comes in. When another blog or website links to you, they are passing on some of their “link juice.” So basically, they are signaling to Google to pass on a bit of their authority on to you. Google sees that another website likes you and finds your information valuable, which in turn means that your information must be valuable to the Google user. And that improves your pagerank.

And that’s why link trading was such a popular SEO strategy, until Google caught on to people using it for SEO purposes. Once an SEO method becomes well known and encouraged by SEO experts, spammers will swoop in and use it for “evil.” Then Google finds out about it and starts penalizing the spammers and giving things like link exchanging less SEO weight.

Unfortunately, guest blogging may be the next SEO method to fall under Google’s ax. The webspam team leader at Google, Matt Cutts, posted on his personal blog this week that guest blogging is dead. This spells trouble for all the bloggers out there who want to share their expertise, broaden their audience, or publish new content onto their own website. The advantages beyond exchanging link juice are many.

Of course, Matt Cutts later went on to say that guest blogging is still a viable option. His exact words were:

“There are still many good reasons to do some guest blogging (exposure, branding, increased reach, community, etc.). Those reasons existed way before Google and they’ll continue into the future. And there are absolutely some fantastic, high-quality guest bloggers out there.”

To put it simply, Google does not want you to guest blog for the sake of SEO. They want content to be valuable to the user, and so they are doing their best to discourage inauthentic guest posting.


How do we save guest posting?

Google has always recommended original, valuable content. Successful bloggers who want to produce quality content are already doing this. Writers should be using their expertise to produce interesting articles that are at least 500 words long. Publishers should field guest post submissions, taking only articles that are worth staking their reputations on.

The very best way to ensure that your guest posts won’t be penalized by Google is to use no follow links. What is a “no follow” link? Basically, when you create a no follow link, none of your link juice will be transferred over to the website you are linking to. When Google spiders your website, it will not follow the link to the other website and register it as one you want to give authority to. With no follow links, you can still produce great content and give credit where credit is due without risking your pagerank. Plus, readers can still click through to the link, giving the website you are linking to a higher readership.

To make a link “no follow,” you need to edit your HTML. Find the original URL. It should be surrounded by < and >. Before the closing bracket, insert (rel=“nofollow”) without the parentheses.

For example, if you were to create a backlink to FreeGuestPost, it would look like this in your WordPress post:


The HTML for a nofollow link

For many website owners, simply switching their backlinks to no follow made a huge difference in their pagerank. If you find that your pagerank is suffering, try updating some of your links.


Sources:

Rampton, John. “Matt Cutts Clarifies Guest Blogging for SEO (with tips).”http://www.searchenginejournal.com/matt-cutts-clarifies-guest-blogging-for-seo/. (22 Jan. 2014).

Hambrick, Kecia. “Nofollow, Dofollow, and your Google Page Rank.”http://basics4bloggers.com/2013/10/nofollow-dofollow-and-your-google-page-rank/. (22 Jan. 2014).

How and When to Embed Social Media Posts onto Your Blog

“Embedding” posts refers to a specific function you can do with your social media posts. Most websites use social media buttons to encourage readers to share, “like,” “+1,” etc., but embedded posts are a little more intricate. Instead of a generic button for Facebook or Twitter, the embedded post shows up on your blog exactly the way the post looks on your social media.

Free Guest Post's Pinterest board for WordPress tips and help

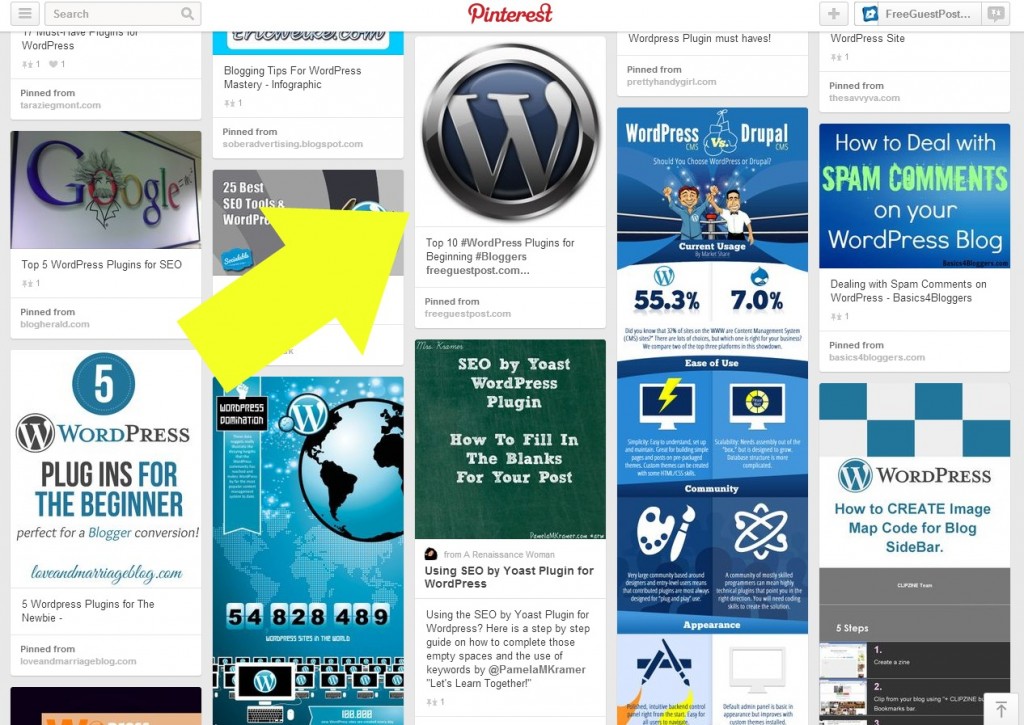
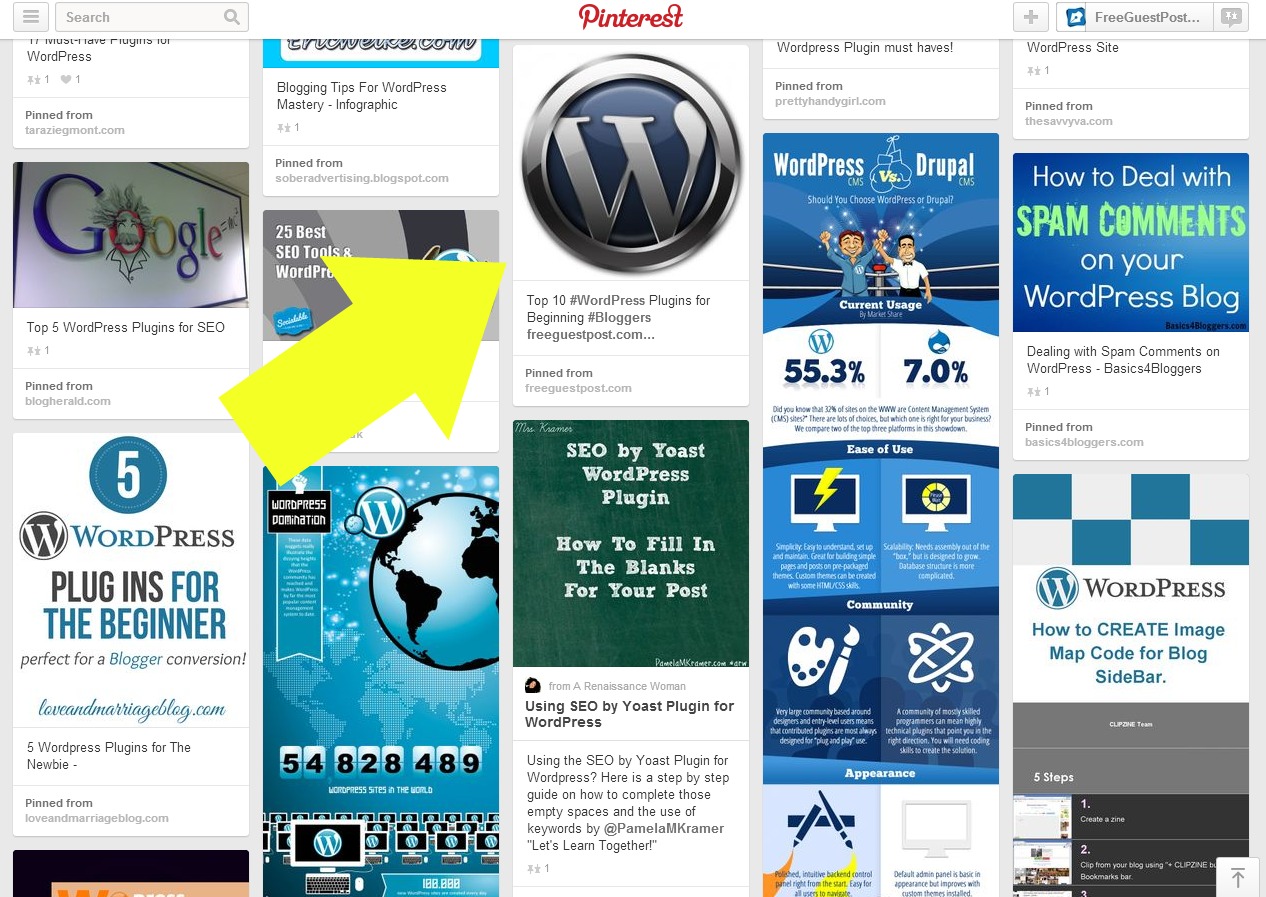
This picture is a screenshot of Free Guest Post’s Pinterest board for WordPress related articles. The yellow arrow points to a pin of one of Free Guest Post’s blog posts, “Top 10 WordPress Plugins for Beginning Bloggers.”

Social media buttons versus embedded Pintrest pin on a blog

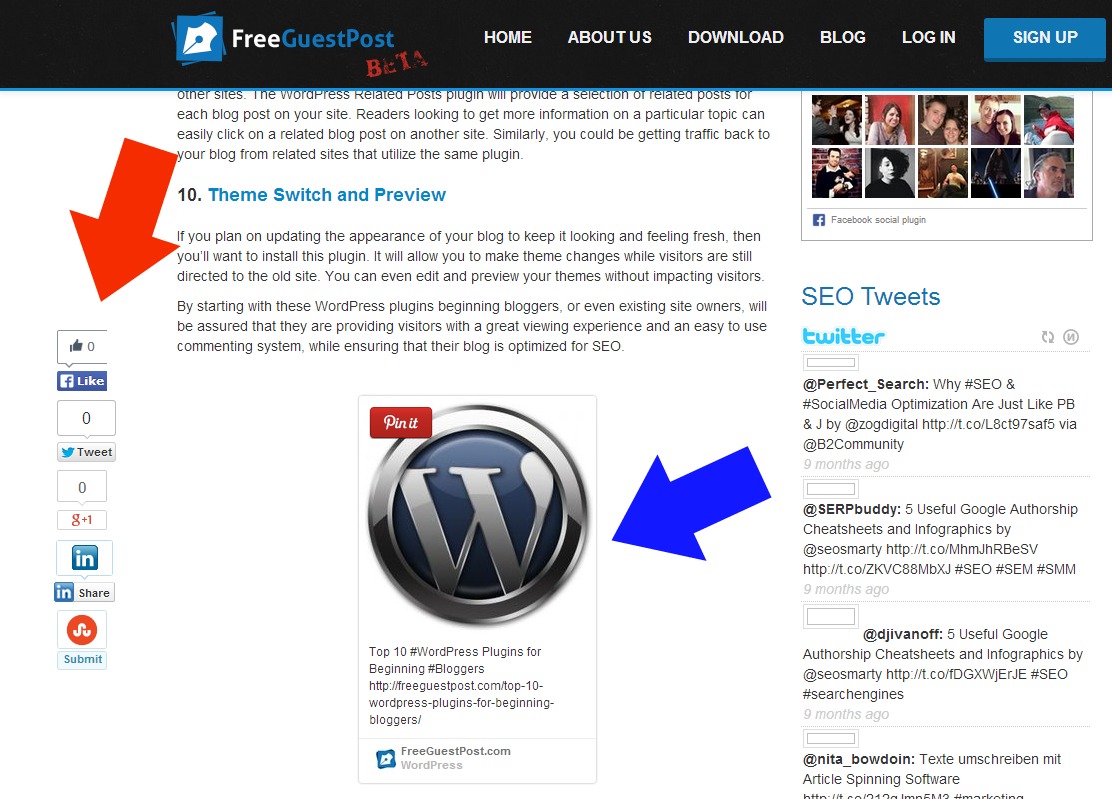
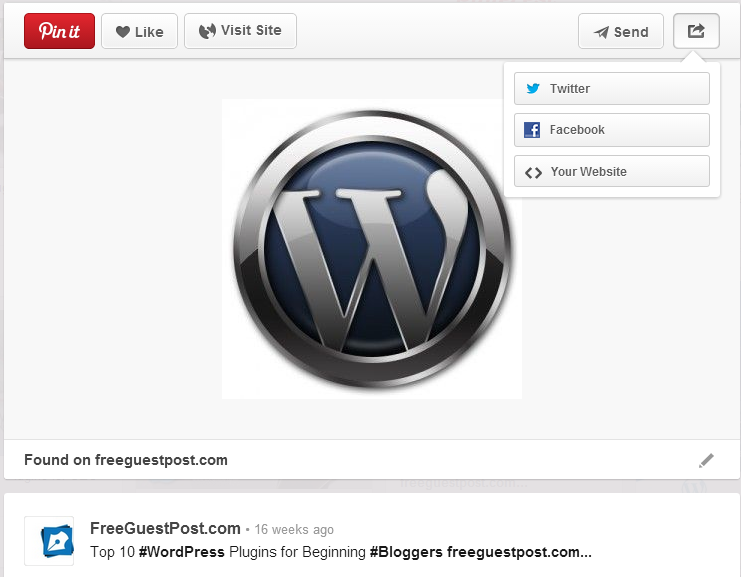
The next screenshot shows the blog post on Free Guest Post’s website. The red arrow points to generic social media buttons that encourage readers to “like” and share. The blue arrow points to the embedded pin taken from Pinterest. It’s fairly identical to the pin found on Pinterest’s website, expect that it also includes a red “Pin it” button.

You can embed posts from Facebook, Twitter, Pinterest, Google+, Instagram, Vine, YouTube, and Tumblr onto your blog.

Unlike social media “like” and share buttons, embedded posts will take the reader directly to the social media post. For example, if you click on the “like,” button, it will show that you’ve liked this post on Facebook. But if you click on the embedded post for a Facebook post, you will be directed to the Facebook fanpage for Free Guest Post.

When to embed social media posts on your blog

Knowing when to embed a social media post into your blog gets a little tricky. You need to have social media buttons on every blog post, preferably ones that are unobtrusive. But having more than one or two embedded posts quickly clutters the page. It’s distracting to the reader, and too many CTAs will result in indecision and an uncompleted objective.

The best time to use an embedded post is when it offers something different from a generic social media button. For example, you might have started a discussion on Facebook from one of your posts that relates to a post on your blog. If you want to encourage more readers to join the discussion, use an embedded post. If you want to remind readers to follow you on social media or to share your post, just stick to the generic buttons.

You don’t need to think twice about embedding Vine or YouTube videos into your blog. If you’ve created a video that relates to your blog post, stick it in there somewhere! Having rich media that is optimized for SEO can increase the chances of your blog post being seen in a Google search result. Videos are also easier for readers to digest and can break up the text into a format that is more pleasing to the eye.

You can also embed a post from social media platforms that do not have a generic button. Vine, YouTube, Instagram, and Tumblr are good examples. Readers can’t share your post on Vine, YouTube, or Instagram, but they can share it on Tumblr – which would take a lot of manual work without the help of an embedded post. Embedding posts from all four of those social media platforms also directs your readers to follow you on Vine, YouTube, Instagram, and Tumblr.

Embed a Facebook post

Embedding a Facebook post is easy. Go to your business page and click on the date of the post you want to embed. This should lead to you a permalink for that post. Copy the URL in the entry bar and paste it into the HTML editor of your blog post.

How to embed a Facebook post into your blog

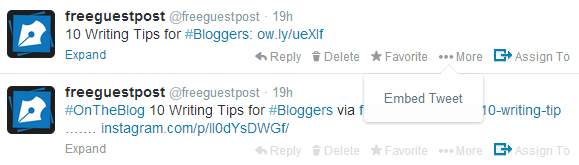
Embed a tweet from Twitter

Go to the tweet you want to embed and click the “more” button. Click “embed tweet.” A preview of your embedded tweet and the code to embed your tweet will appear. Copy and paste that code into your HTML editor again.

How to embed a tweet from Twitter onto your blog

Embed a Google+ post

Go to your post on Google+ that you want to embed. In the upper left corner, a small arrow will appear. Click on the arrow and then click the option to “embed post.” Copy and paste the code into your HTML editor.

Embed a pin from Pinterest

Embedding a Pinterest pin is the most difficult social media post to embed. But don’t worry, once you figure out the instructions, it’ll be simple.

Click on your pin to expand it. In the upper left corner, there is a box with an arrow coming out of it. Click the selection for “Your Website.” You will be directed to a page that allows you to pick the format of your embedded pin. You can also embed a profile widget and board widget that will put your Pinterest profile or specific board into your website. Scroll down to the “Copy the code” box and select the part of the code that begins and ends with “<script.” Paste that into the bottom of your blog post HTML editor. Then copy and paste the “Pin URL” section to whichever part of your blog post you want to pin to appear in.

How to embed a Pinterest pin onto your blog

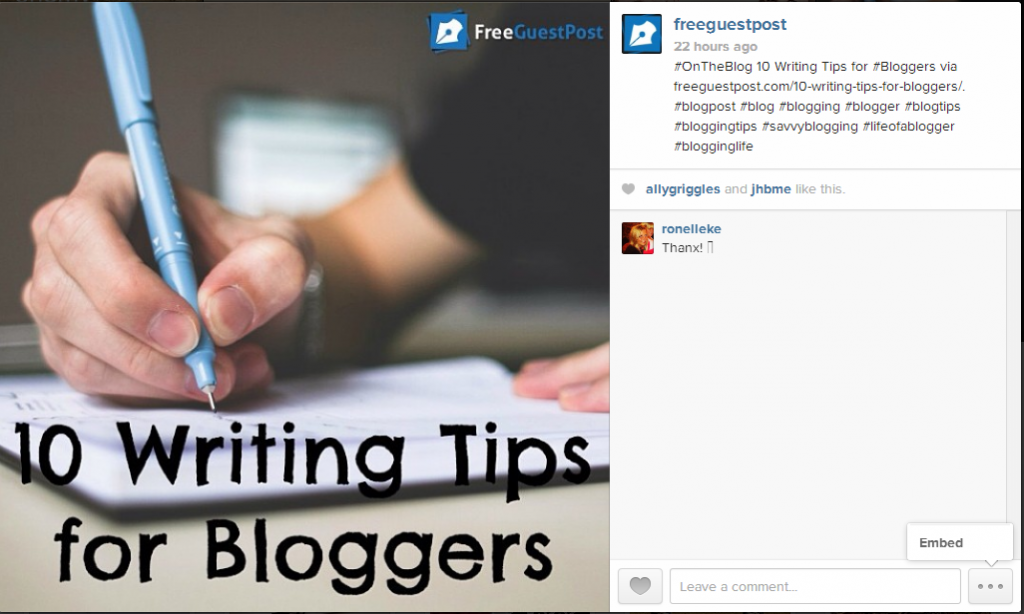
Embed an Instagram post

Visit Instagram.com on your computer and go to your Instagram profile. Expand the picture you want to embed. The lower left corner has a button with three dots. Click on it and select the “embed” option. Copy the code and paste it into your HTML editor.

How to embed an Instagram picture onto your blog

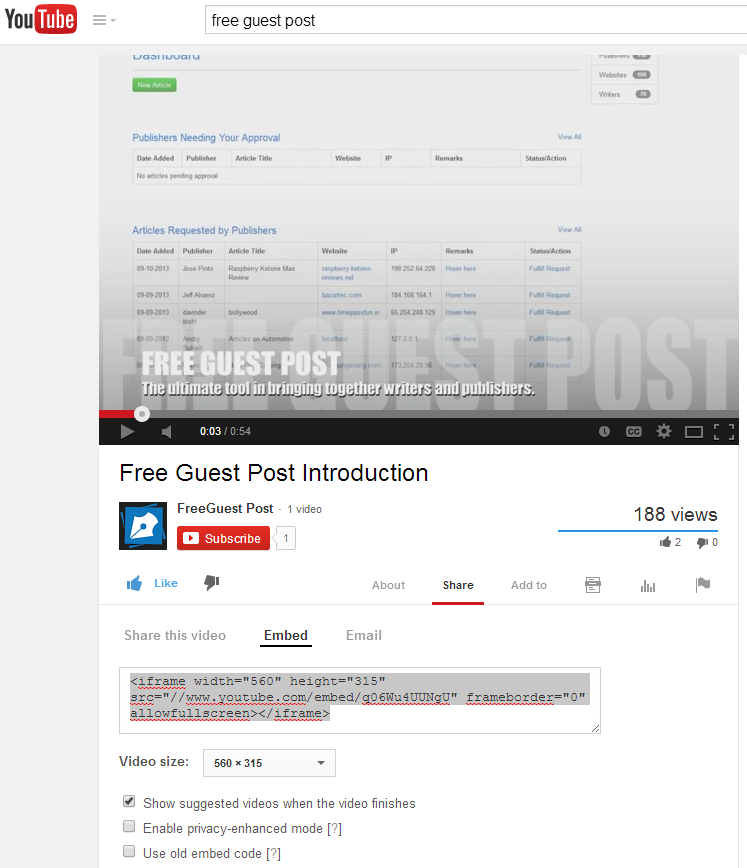
Embed a video from YouTube

Find the YouTube video you’d like to embed. Unlike other social media posts, you can embed any YouTube video into your post, whether you were the original publisher or not. Click the “Share” option below the video, then click “Embed.” Copy and paste the code to any location within your HTML editor of your blog post.

How to embed a YouTube video onto your blog

Embed a video from Vine

You can tweet a Vine and then embed the tweet. If you have WordPress, there are also plugins that will embed a Vine for you. But you can also do it yourself from your Vine account. Log into Vine on your phone. Find your video and click the button on the bottom left with the three dots, just like Instagram. Click “Share this post,” then “Embed.” It will then direct you to your email and the code will be in the body of the email. Send it to yourself or a trusted friend. Then copy and paste the code into the HTML editor of your blog.

Embed a Tumblr post

Unfortunately, Tumblr has not created a function allowing users to embed posts. Instead, we have to use Embeddlr.com, a website created specifically to embed Tumblr posts. You will only be able to embed video, audio, photo, and chat category posts, not text or quote posts. You can find the permalink of the post by right clicking and opening in a new tab or by clicking the “notes” function of the post. Copy and paste the permalink into Embeddlr, then copy and paste the generated code into your HTML editor of your blog post.

Which social media posts do you embed on your blog?

FGP Update: Copyscape will prevent plagiarism, build trust between writers and publishers

You may have noticed a few changes in Free Guest Post now that we’ve come out of beta mode. The biggest change is the implementation of Copyscape software into our usual guest posting system. Copyscape is a service that website owners can use to protect their content from being re-published on another website. Free Guest Post is using it to prevent writers from offering duplicate content to unsuspecting publishers.

What this means for writers:

Writers, submit your content as you normally do. With the update, your article will now be automatically scanned by Copyscape before it is allowed into the general pool of articles that publishers can pick from. If any of your content is copied from another source, the system will now keep the article in draft status until enough changes are made to the text to pass Copyscape and be marked “Certified Original.”

Although writers may feel they are under added scrutiny, having a guarantee that their work is not plagiarism is a benefit to them as well as publishers. Publishers can now trust all the articles available for publication, including yours, increasing the chances for each to get published. Your content will have greater circulation, a bonus for any writer trying to build up a portfolio of online articles or publicize their website using backlinks.

What this means for publishers:

Publishing duplicate content adds no value to your website, whereas publishing original, quality content can help boost your SEO and bring traffic to your website. Publishing plagiarized content can, however, hurt your reputation and destroy relationships you’ve created with other bloggers and writers.

Now using Free Guest Post to find guest articles is completely safe, thanks to Copyscape. You never have to entertain the possibility of accidentally publishing duplicate content. Free Guest Post can guarantee that none of the articles offered by writers contain plagiarism. Your website will continue to be a place where readers can find original, quality content created by guest posters.

For more information on guest posting without incurring Google’s wrath, visit our blog post “How to Guest Post Without Pissing Off Google.”

25 Comment Hacks: A Cheat Sheet for Inspiring Your Readers to Engage with Your Blog Posts

Readers visit blogs for many reasons: to learn something new, to discover a new perspective, or to be entertained. But there is one reason that stays the same throughout every other motivation – they come to blogs to connect with other people. Both business blogs and personal blogs always have the prime directive of relating to the reader, because that’s what appeals to the reader the most. One good measurement of how well you are fulfilling this directive is whether or not your readers are commenting on your blog posts. Comments are a way for readers to respond to your blog post and to extend the conversation. So if your blog is struggling to get comments, look no further than this ultimate cheat sheet of 25 comment hacks:

  1. End your blog post with a question. Questions show the reader that you are interested in their thoughts, rather than just a one-sided conversation.
  2. Respond to the comments you receive. Even just a quick “thanks for stopping by!” shows commenters that you value their contributions.
  3. Use a contest to motivate readers to comment. The comment can be the participant’s entry into the contest.
  4. Ask readers to share a picture in the comments of something that relates to your post. If you’re talking about organization, ask them what their desk looks like and request proof!
  5. Make commenting as easy as possible. This might mean that you have to endure a certain amount of spam, but that’s better than losing potential commenters partway through the process.
  6. Write about a controversial topic. Take a stand.
  7. Use a plugin or widget that allows readers to “upvote” or “like” other comments. This will motivate readers to read through many comments to see who they agree or disagree with, which may further inspire them to comment themselves.
  8. Try not to delete comments, even if they are negative. You can delete spam and inappropriate material, but if someone doesn’t like what you have to say, let them express that. This will show other commenters that you are willing to listen – and it may inspire commenters who side with you to comment in opposition to the negative comment.
  9. Be positive in your own comments, even to the negative ones. You need to put on your most diplomatic hat. For positive comments, make the commenter feel good with praise or admiration of their thoughts.
  10. Comment on other blogs. This will gain you easy exposure, and the blog you comment on may return the favor.
  11. When you are writing your blog post, remember your audience. Write to them. If your audience feels like you are talking to them, they will be more likely to respond.
  12. Use the WordPress plugin “CommentLuv.” When readers comment on your blog, their latest blog post title will automatically show up with their remarks. That kind of free, easy publicity is hard for your audience to pass up.
  13. Create a poll that readers can vote on.
  14. Use insightful comments as a jumping off point for another blog post. Readers might have useful questions that you can answer, or new observations to flesh out your previous thoughts.
  15. Weed out spam. Seeing spam on someone’s blog post is like seeing garbage – people stay away from it. So while you should make commenting as easy as possible, you should also use an approval system, widget, or plugin so that you can moderate comments. If you moderate comments, just be sure to approve the good ones as quickly as possible.
  16. Open up other methods of communication. It’s easier to comment on social media or send a quick email, but having other lines of communication available eventually paves the way for readers to comment on the actual blog post.
  17. Allow users to comment anonymously.
  18. Create a comment policy and allow readers to access it easily. Comment policies can include what type of language is allowed, how commenters should interact with other readers, whether or not a backlink is allowed, etc. Then stick a link to that policy right next to where readers can submit comments.
  19. Install a plugin or widget that gives commenters the option of subscribing to the comments. This feature will notify readers if any other comments are made so that they can return to add more to the conversation.
  20. Publish a post from a guest. The other writer will publicize the blog post in different places than you usually do, inviting new traffic to your website.
  21. Create a numbered list post and ask readers to add to it. This is an especially compelling tactic if you leave your list incomplete.
  22. Have an approachable persona. Readers resent someone who acts like a know-it-all. A good way to accomplish this is to write about shortcomings or mistakes as well as successes and expertise.
  23. Invite readers to share their stories and experiences. If you’re sharing a bad travelling story, ask your readers to comment with one of their own.
  24. Ask visitors to subscribe to your blog. You can do this with an RSS feed or email newsletter(though email newsletters generally inspire more engagement). Consistent reminders of new posts will entice readers to visit more, leading to a higher probability of them commenting.
  25.  Write compelling content!

What strategy for gaining more comments would you add to the list? You know where to share it …

Sources:

Poh, Michael. “7 Splendid Techniques To Encourage Comments On Your Blog.”http://www.hongkiat.com/blog/encourage-blog-comments-tips/. (8 April 2014).

Hines, Krisiy. “5 Essential WordPress Plugins For Comments.”http://www.hongkiat.com/blog/essential-wordpress-comments-plugins/. (8 April 2014).

“How to Encourage Comments on Your Blog.” http://www.theblogmaven.com/how-to-encourage-more-comments-on-your-blog/. (8 April 2014).

Reiter, Grechen. “5 Ways to Get More Comments on Your Blog.” http://heartifb.com/2013/05/03/5-ways-to-get-more-comments-on-your-blog/. (8 April 2014).

Kingston, Charlene. “7 Tips to Increase Your Blog Comments.”http://www.socialmediaexaminer.com/7-tips-to-increase-your-blog-comments/. (8 April 2014).

Urban, Diana. “9 Ways to Encourage People to Comment on your Blog.” http://blog.hubspot.com/blog/tabid/6307/bid/8906/9-Ways-to-Encourage-People-to-Comment-on-your-Blog.aspx. (8 April 2014).

Why Switch to a WordPress Website

If you’re like the majority of website owners, your greatest hang-ups emerge when it’s time to make any type of update to your site. A section of content on your home page becomes outdated, and suddenly you find yourself at the mercy of your web designer or developer for something as simple as changing a few dates in some text, or swapping out a photo for another.

Not being able to manage the content on your own site is a huge stressor, time-drain, and expense for far too many site owners. Why? Well your options are pretty sparse:

  1. Learn HTML, FTP, and any number of other complicated protocols.
    You’ve entered your line of work for a specific reason: it’s what you wanted to do! Putting up a website is a necessary evil in achieving your actual dream. You don’t have the time or interest in becoming a web designer just so you can do business online.
  2. Hire someone who has gone to school for this stuff. Pay the big bucks for quality!
    It’s all too tempting to be lured into a contract with a web design/development company who promises you the world for just a few hundred dollars, but the fact is when it comes to web design, you will get what you pay for. A high functioning and performing website will cost you upwards of $1000.
  3. Switch to a dynamic, user-friendly platform.
    The learning curve is minimal. The platform is free. Making website updates becomes a matter of a few clicks.

The Fantastic Perks of Switching to WordPress

WordPress is a free content management system that is used worldwide by millions of site owners (it supports more than 60 million websites!), more than any other CMS or similar product. Why are people making the switch to WordPress from their static HTML sites?

  1. Easy peasy updates! WordPress isn’t just for bloggers. It allows you to make updates to content on your standard website pages as well. It’s an uncomplicated way to keep your site info updated and ready for consumption by all your potential customers.
  2. Increased flexibility! With access to hundreds of free and paid plugins and themes, you can customize the look and functionality of your site with ridiculous ease.
  3. Better SEO functions. As opposed to other CMSs, WordPress is predesigned to help you with your search engine optimization strategy. It’s already well positioned to draw in Google traffic.
  4. Easy one-to-one conversions. If you have an existing static site that you need switched over the WordPress, it’s only a matter of a few days and a couple hundred dollars to do it. Often this is a one-to-one conversion, where the WordPress version copies the original in look and functionality as closely as possible.
  5. Ease of programming. If you are making a fresh site from scratch, hiring a designer who is familiar with WordPress will be simple and (depending on the scope of your site) cost-effective, because of WordPress’s popularity.
  6. Awesome integration abilities! WordPress isn’t just the most popular choice for millions of website owners; it’s the number one option for third party software as well, such as email clients that have special features that integrate with WordPress.
  7. Affordability! Your expenses with WordPress are optional. Depending on the themes and plugins you choose, you’ll only be paying for hosting services and domain registration.
  8. Support and resources. There are countless resources out there that offer WordPress support and help, including tutorials and forums, whenever the need arises. It has an excellent community that proves to be an invaluable asset as a WordPress site owner.

The Only Reason Not to Make the Switch

You are utterly and completely happy with your website’s look, functionality, and the ease with which you can make even the simplest of updates. Oh yeah? Lucky you! If that’s the case, I wouldn’t recommend switching to WordPress. However, if you’re only kidding yourself, maybe now’s the time to admit it and jump on board.

What’s your biggest pet peeve about your site?

Sources

Padovani, Stephanie. “7 Reasons You Should Switch to WordPress.”http://www.bookmorebrides.com/7-reasons-you-should-switch-to-wordpress/. (September 5, 2014.)

5 Common SEO Mistakes You Didn’t Know You Were Making

Successful website auditor Alan Schill recently wrote on areas of SEO that he’s noticed the majority of website owners neglecting to their own detriment. These are low-hanging fruits that you may even be ignoring as you strategize ways to optimize your site for the search engines. Take a look.

1. How heavily do you pepper your content with keywords?

Keyword stuffing is an archaic SEO trick that people still fall back on out of habit. It’s only a matter of time before Google penalizes these sites for being spammy. Google’s goal will forever be to favor high-quality websites over the ones that try to take the back door to the top of the rankings. If your website is about lawn care and you strive to populate your blog with lawn care related how-tos as well as stay on topic in all your other web copy, your keywords will appear naturally throughout your text. The result will be a website that looks natural to Google while relevant and informative to your guests.

2. Are your blog images at the top of your posts?

Because people like visual aids, blogs do better when there are images attached to them. And they do even better when those images are at the top of the post, not sprinkled around in the middle. Don’t neglect this simple technique to draw the eyes of your visitors to your posts.

3. Who’s Your Audience—Google or Your Web Visitor?

This one ties in perfectly with question #1. Think about it: why would an SEO professional write content for the search engine instead of the visitor? To game the search engines and get to the top of the rankings, of course. Why would they want to do that? Well, to make a pay check, because unless that SEO has stock in the company they’re SEOing for, they may not care what happens after the target audience clicks on the link. This should bother you. This should bother you a lot.

Remember, Google doesn’t like to be played and every algorithm change is designed to make it more and more difficult to play them. Your objective should be to educate your target audience and offer them valuable content and products. Do this, write for them, and you will begin to see conversions in the areas that matter—sales.

4. Are you linking to websites that Google likes?

If you’re making an effort to create a high quality site, don’t waste your outbound links on sites that Google would view as spammy or low quality. Your site is better than that and you don’t want to be tainted by association. It’s considered good practice to link out to at least one respected website per piece of content on your site. Links to sources count.

5. Are you interlinking between blog posts?

If you’re writing content relevant to your industry and target audience, your blog topics are going to relate and you will have plenty of opportunities to interlink between them. This gives an SEO boost to newly created pages, lowers bounce rates by keeping your readers exploring between pages, and increases the chances that those visitors will convert.If you haven’t done this, it’s not too late to go back to your old posts and find which ones flow naturally into each other.

What now?

How many of these errors sound familiar? Hopefully we’ve given you a good start on critically analyzing your current SEO methods and beginning the process of improvement. Good luck!

Source
Schill, Alan. “SEO 101: 18 Search Rankings & Engagement Factors You Can’t Ignore.”http://www.searchenginejournal.com/18-search-rankings-engagement-factors-you-cant-ignore/119638/. November 21, 2014.